Amazon Quick integration with time-series databases for market intelligence using MCP | Amazon Web Services
Model Context Protocol (MCP) integration in Amazon Quick transforms how financial analysts access time-series market intelligence, removing the need for complex database queries. As a financial analyst, you navigate millions of stock trades flowing through markets every second, searching for patterns that drive trading decisions. Financial institutions often use time series databases to analyze high-frequency market data.
In this post, we walk through a practical implementation using KDB-X MCP server integration with Amazon Quick, demonstrating how traders and analysts can ask questions using conversational language and receive actionable insights from datasets. You can apply this same integration pattern across various domains, from financial market analysis to IoT sensor monitoring to DevOps performance dashboards, where you need to simplify access to time series insights.
Solution overview
Amazon Quick is a comprehensive, generative AI-powered business intelligence service that you can use to analyze data, create visualizations, automate workflows, and collaborate across your organization. With MCP integration in Amazon Quick, you can connect to MCP servers for both task execution and data access capabilities. MCP provides a standardized way to connect AI systems with external tools and data sources. In this example, you’ll work with time series databases provided by KDB-X, which is built on the industry-leading kdb+. kdb+ is a high-performance time-series database and analytics engine, powered by the vector language q.
We begin by installing the KDB-X MCP server on an Amazon Elastic Compute Cloud (Amazon EC2) instance. This installation enables the KDB-X service to run continuously and establishes the connection between the MCP server and KDB-X service for query execution. Quick translates natural language queries into SQL statements and passes them to the KDB-X MCP server, which executes these queries against the KDB-X database.
To connect the MCP server with Quick, we use Amazon Bedrock AgentCore Gateway as an authentication and routing layer. The AgentCore Gateway serves as a single access point for the agent to interact with its tools. In our architecture, we configure MCP servers as targets within the AgentCore Gateway, enabling communication with the MCP server running on Amazon EC2. We also implement inbound authorization for the AgentCore Gateway, which validates users attempting to access targets through the gateway. Since MCP integration in Quick requires authentication credentials, the inbound authentication to the gateway fulfills this requirement for the MCP connector. For this solution, we configure Amazon Cognito as the identity provider for accessing the AgentCore Gateway. This integration appears in the Quick chat interface as actions, allowing users to perform relevant tasks and boosting productivity through third-party service integration.

Prerequisites
Verify that you meet the following prerequisites to deploy the solution in your own AWS account using the step-by-step instructions in this post. Before you begin, make sure that you have the following:
- An AWS account
- Amazon Quick set up with Author Pro subscription
- Permission to create AWS resources and AWS Identity and Access Management (IAM) roles and policies
- Basic knowledge of AWS services
- Access to KDB-X (sign up to the KDB-X public preview)
- UV Installed for running the KDB-X MCP Server
Configuration of MCP server
With the prerequisites in place, we will configure the MCP server on your EC2 instance.
The KDB-X MCP server provides access to domain-specific tools such hybrid_search, run_sql_query and similarity_search. These tools are implemented as custom Python functions. The server extends the ability to query KDB-X data through natural language. Users can perform specialized tasks such as computing volatility, querying market data, or semantically searching SEC filings within KDB-X tables.
Follow these steps to install and run the MCP server on EC2. Start by launching an EC2 instance, preferably t2.medium or larger.
- Clone the repository
Begin by cloning the KDB-X MCP server repository to your EC2 instance.
- Install KDB-X Service
The MCP server requires KDB-X service running in the background. Install KDB-X by signing up for the KDB-X public preview as mentioned in the prerequisites section.
- Configure KDB-X Service
Configure the KDB-X service to listen on port 5000. We will create a sample dataset that simulates trade data over time with random values for price, size, and symbols.
Create a dedicated OS service account for KDB-X:
useradd -r -s /sbin/nologin kdbx-svc
mkdir -p /opt/kdbx
cp -r /root/.kx /opt/kdbx/.kx
chown -R kdbx-svc:kdbx-svc /opt/kdbx
Download the stocks.txt file containing stock symbols.
curl -sL https://raw.githubusercontent.com/KxSystems/kdb-x-mcp-server/main/stocks.txt \
  -o /opt/kdbx/stocks.txt
chown kdbx-svc:kdbx-svc /opt/kdbx/stocks.txt
Create the startup script. Copy the following into a plain text editor and paste into the terminal:
python3 << 'PYEOF'
script = """#!/bin/bash
export QLIC=/opt/kdbx/.kx
cd /opt/kdbx
/opt/kdbx/.kx/bin/q -p 5000 << 'QEOF'
.s.init[]
.ai:use `kx.ai
syms: 100?`$read0 `:stocks.txt
n: 20000000; day: 2025.01.01
trade:([] time:asc (`timestamp$day)+n?24:00:00; sym:n?syms; price:n?100f; size:n?1000)
count trade
10 sublist trade
QEOF
"""
with open('/opt/kdbx/start-kdb-x.sh', 'w') as f:
    f.write(script)
print("Done")
PYEOF
chmod +x /opt/kdbx/start-kdb-x.sh
chown kdbx-svc:kdbx-svc /opt/kdbx/start-kdb-x.sh
This script initializes the KDB-X service and creates a dummy table with stock data. It randomly selects 100 stock symbols from the file. The script also prints 10 sample rows to verify successful data ingestion.
- Start and Verify KDB-X Service
Create the systemd service unit. Copy the following into a plain text editor and paste into the terminal:
python3 << 'PYEOF'
unit = """[Unit]
Description=KDB-X Database Service
After=network.target

[Service]
Type=simple
User=kdbx-svc
WorkingDirectory=/opt/kdbx
ExecStart=/opt/kdbx/start-kdb-x.sh
Restart=on-failure
NoNewPrivileges=true
ProtectSystem=strict
PrivateTmp=true
ReadWritePaths=/opt/kdbx

[Install]
WantedBy=multi-user.target
"""
with open('/etc/systemd/system/kdb-x-service.service', 'w') as f:
    f.write(unit)
print("Done")
PYEOF
systemctl daemon-reload
systemctl enable kdb-x-service.service
systemctl start kdb-x-service.service
Run the following commands to check the service status and verify the logs:
# Check status
sudo systemctl status kdb-x-service.service

# View logs to confirm initialization
sudo journalctl -u kdb-x-service.service -n 50
When you check the status, you should see output similar to this:
kdb-x-service.service - KDB-X Database Service
Loaded: loaded (/etc/systemd/system/kdb-x-service.service; enabled; preset: disabled)
Active: active (running) since ...
Main PID: XXXXX (start-kdb-x.sh)
CGroup: /system.slice/kdb-x-service.service
├─XXXXX /bin/bash /opt/kdbx/start-kdb-x.sh
└─XXXXX /opt/kdbx/.kx/bin/q -p 5000
Note: KDB-X runs as a dedicated kdbx-svc account with no login shell, no sudo, and no SSH keys. The systemd unit enforces NoNewPrivileges, ProtectSystem=strict, and PrivateTmp=true to limit blast radius if the process is compromised. The service is enabled to auto-start after a reboot.
- Start the MCP Server
Install uv and set up the MCP server service:
curl -LsSf https://astral.sh/uv/install.sh | env HOME=/root sh
cp /root/.local/bin/uv /usr/local/bin/uv
chmod 755 /usr/local/bin/uv
chown -R ec2-user:ec2-user /opt/kdbx-mcp
Create the MCP server systemd service. Copy the following into a plain text editor and paste into the terminal:
python3 << 'PYEOF'
unit = """[Unit]
Description=KDB-X MCP Server
After=network.target kdb-x-service.service
Requires=kdb-x-service.service

[Service]
Type=simple
User=ec2-user
WorkingDirectory=/opt/kdbx-mcp
Environment="PATH=/usr/local/bin:/usr/bin:/bin"
Environment="QLIC=/opt/kdbx/.kx"
ExecStart=/usr/local/bin/uv run mcp-server --mcp.transport streamable-http --mcp.host 127.0.0.1 --mcp.port 8080 --db.host 127.0.0.1 --db.port 5000
Restart=on-failure

[Install]
WantedBy=multi-user.target
"""
with open('/etc/systemd/system/kdb-mcp-server.service', 'w') as f:
    f.write(unit)
print("Done")
PYEOF
systemctl daemon-reload
systemctl enable kdb-mcp-server.service
systemctl start kdb-mcp-server.service- Verify MCP Server configuration
To confirm the MCP server is configured correctly, run this command to display available tools:
curl -X POST http://127.0.0.1:8080/mcp \
  -H "Content-Type: application/json" \
-d '{"jsonrpc":"2.0","id":1,"method":"tools/list","params":{}}'- Configure HTTPS endpoint for KDB-X MCP Server
Replace <public-ip-of-ec2> with your EC2 instance’s public IP address. After completing these steps, you will have a running MCP HTTPS endpoint accessible at <public-ip-of-ec2>.nip.io/mcp.
For production deployments, replace nip.io with a domain registered in Amazon Route 53 with DNSSEC enabled, use AWS Certificate Manager (ACM) to issue and manage TLS certificates, and front the EC2 with an internal Application Load Balancer. You can then configure Amazon Bedrock AgentCore Gateway with VPC egress using Amazon VPC Lattice to route traffic from AgentCore to your MCP server entirely within the AWS network, without any public internet exposure. See Configuring Amazon Bedrock AgentCore Gateway for secure access to private resources.
Step 1: Install Required Packages
Update your system and install Nginx with Certbot for SSL certificate management:
sudo yum update -y
sudo yum install -y nginx python3-certbot-nginx
sudo systemctl start nginx
sudo systemctl enable nginx
Step 2: Create Temporary HTTP Configuration
Set up a temporary HTTP configuration for certificate verification. Create the necessary directories and configuration file:
sudo mkdir -p /var/www/html
sudo mkdir -p /etc/nginx/conf.d
sudo tee /etc/nginx/conf.d/mcp-server.conf > /dev/null << 'EOF'
server {
    listen 80;
    server_name <public-ip-of-ec2>.nip.io;
    location /.well-known/acme-challenge/ {
        root /var/www/html;
    }
    location / {
        return 200 "Temporary - obtaining certificate";
        add_header Content-Type text/plain;
    }
}
EOF
Step 3: Test and Reload Nginx
Verify the configuration syntax and reload Nginx:
sudo nginx -t
sudo systemctl reload nginx
Step 4: Configure EC2 Security Group
Verify your EC2 security group allows inbound traffic on Port 80 and 443.
Step 5: Obtain Let’s Encrypt Certificate
Request an SSL certificate from Let’s Encrypt. Replace the email address with your own:
sudo certbot certonly --nginx \
  -d <public-ip-of-ec2>.nip.io \
  --non-interactive \
  --agree-tos \
  --email <your-email@example.com>
Step 6: Configure HTTPS-Only Access
After obtaining the certificate, update the Nginx configuration to enable HTTPS and redirect all HTTP traffic:
sudo tee /etc/nginx/conf.d/mcp-server.conf > /dev/null << 'EOF'
# Redirect all HTTP to HTTPS
server {
    listen 80;
    server_name <public-ip-of-ec2>.nip.io;
    location /.well-known/acme-challenge/ {
        root /var/www/html;
    }
    location / {
        return 301 $host$request_uri;
    }
}

# HTTPS server - your application runs here
server {
    listen 443 ssl;
    server_name <public-ip-of-ec2>.nip.io;
    ssl_certificate /etc/letsencrypt/live/<public-ip-of-ec2>.nip.io/fullchain.pem;
    ssl_certificate_key /etc/letsencrypt/live/<public-ip-of-ec2>.nip.io/privkey.pem;
    ssl_protocols TLSv1.2 TLSv1.3;
    ssl_ciphers HIGH:!aNULL:!MD5;
    ssl_prefer_server_ciphers on;
    location / {
        proxy_pass localhost:8080/;
        proxy_set_header Host $host;
        proxy_set_header X-Real-IP $remote_addr;
        proxy_set_header X-Forwarded-For $proxy_add_x_forwarded_for;
        proxy_set_header X-Forwarded-Proto $scheme;
    }
}
EOF
Step 7: Apply Configuration Changes
Test the updated configuration and reload Nginx:
sudo nginx -t
sudo systemctl reload nginx
Your MCP server is now accessible through HTTPS at <public-ip-of-ec2>.nip.io/mcp. All HTTP requests will automatically redirect to HTTPS, supporting secure communication between Quick and your KDB-X MCP server.
Amazon Bedrock AgentCore Gateway integration with MCP
Amazon Bedrock AgentCore Gateway provides a secure way for developers to build, deploy, discover, and connect to tools at scale. With Gateway, developers can convert APIs, AWS Lambda functions, and existing services into MCP-compatible tools and make them available to agents through Gateway endpoints with just a few lines of code. In AgentCore Gateway, you can define a preconfigured MCP server as a target when creating a gateway.
Now that your HTTPS endpoint is running, you can integrate it with AgentCore Gateway as an MCP server target. Follow these steps:
- Navigate to the Amazon Bedrock AgentCore Gateway console and select Gateways from the left navigation pane. Choose Create Gateway to begin.
- For inbound authorization, configure the following parameters. This solution uses a Cognito user pool as the inbound authorization mechanism for the AgentCore Gateway:
- Identity provider
- Discovery URL
- Allowed Clients
- Under Targets, select MCP server as the Target type. Enter your HTTPS endpoint as the MCP endpoint URL. After the target is successfully attached, it will display a Ready status as shown in the following screenshot, confirming the connection is established.

With your AgentCore Gateway configured and running, you’re ready to create an integration within Quick. For production deployments, consider adding per-IP rate limiting in Nginx and enabling AWS CloudTrail for API activity.
Integration with Amazon Quick actions
To integrate with Quick, select Integrations from the left panel and choose Actions. Choose Model Context Protocol from the available options. Integrations in Amazon Quick connect you to external applications and services for AI-powered analysis and automation. Action connectors create secure connections between Quick and external services. With MCP integration, you can connect to MCP servers for both task execution and data access capabilities. Follow these steps to complete the integration:
- Provide the Gateway resource URL from your created AgentCore Gateway as the MCP server endpoint.
- For Authorization type, select Service-to-Service OAuth. Enter the following details from your Cognito user pool configuration:
- Token URL
- Client ID
- Client Secret
For production deployments, store the Cognito Client ID and Client Secret in AWS Secrets Manager. Retrieve the values on-demand when configuring the Quick connector and enable automatic rotation in Secrets Manager. Consider attaching an AWS WAF web ACL to the Cognito user pool to protect the /oauth2/token endpoint from credential stuffing and brute-force threats.
- After the integration is created, all available tools from the MCP server will appear in the Actions section as shown in the following screenshot.

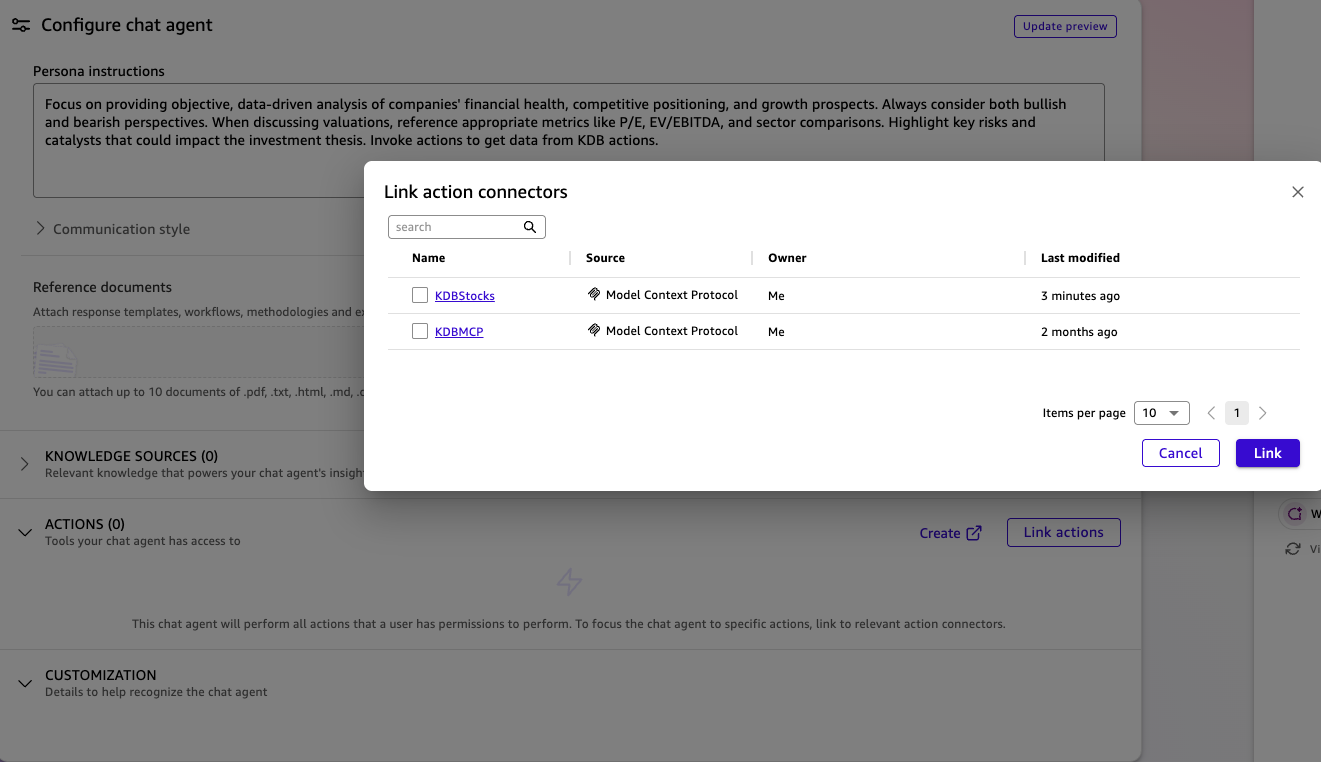
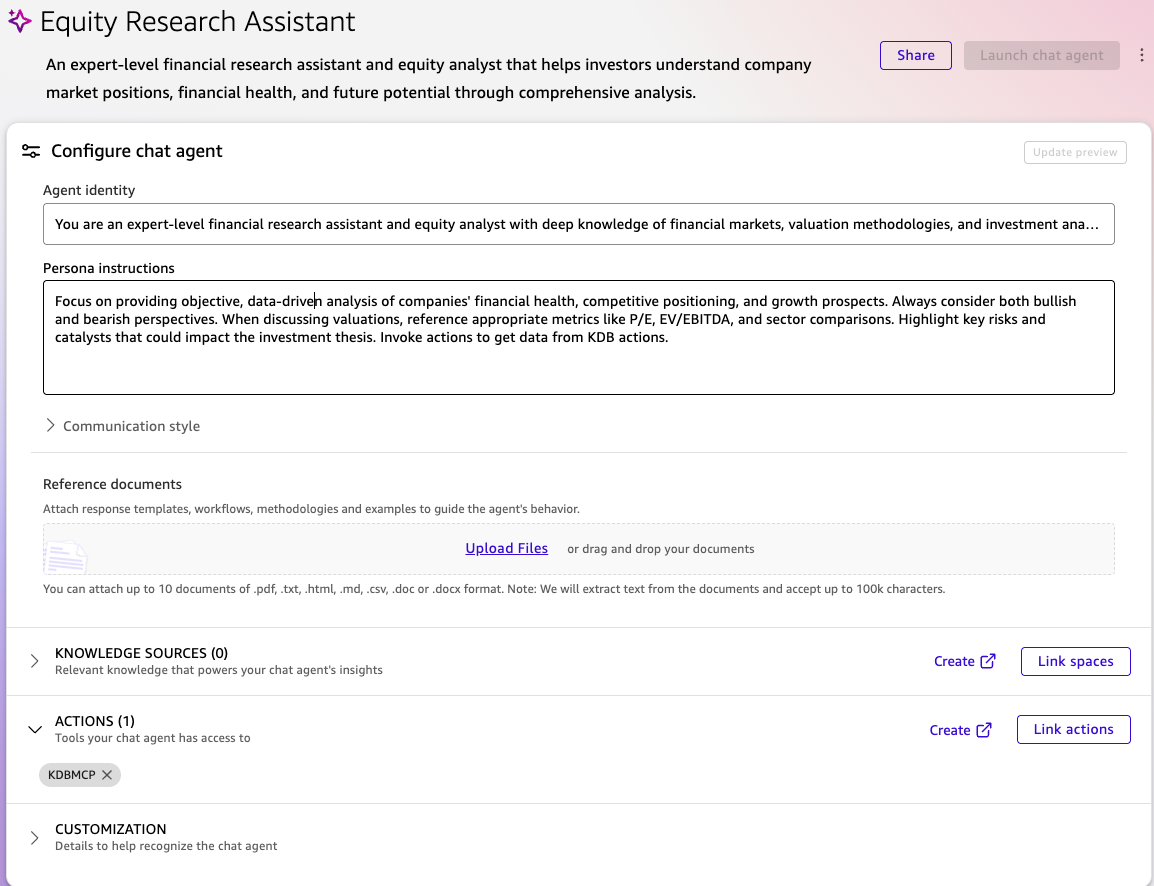
- With the integration ready, you can now create a chat agent for stock analysis. When creating the chat agent, select the action you configured as shown in the following screenshot. You can add multiple actions to your agent as needed. Provide an appropriate description and instructions summary that define the agent’s purpose and capabilities.Here’s a sample configuration for an equity research assistant. You can also add explicit data scope guardrails to the system prompt, for example, limiting the agent to specific tables, date ranges, and query types.Description: An expert-level financial research assistant and equity analyst that helps investors understand company market positions, financial health, and future potential through comprehensive analysis.Instructions Summary: Focus on providing objective, data-driven analysis of companies’ financial health, competitive positioning, and growth prospects. Always consider both bullish and bearish perspectives. When discussing valuations, reference appropriate metrics like P/E, EV/EBITDA, and sector comparisons. Highlight key risks and catalysts that could impact the investment thesis.
- Select Chat to start interacting with your equity research assistant. The agent can now process natural language queries, translate them into SQL statements, execute them against your KDB-X time series database, and return actionable insights.
Interaction with the chat agent
To illustrate the Actions integration within Quick, consider a financial analyst who needs to navigate stock trades for specific securities and identify patterns. Here are several example queries that demonstrate the agent’s capabilities:
Query 1: Retrieve sample stock data
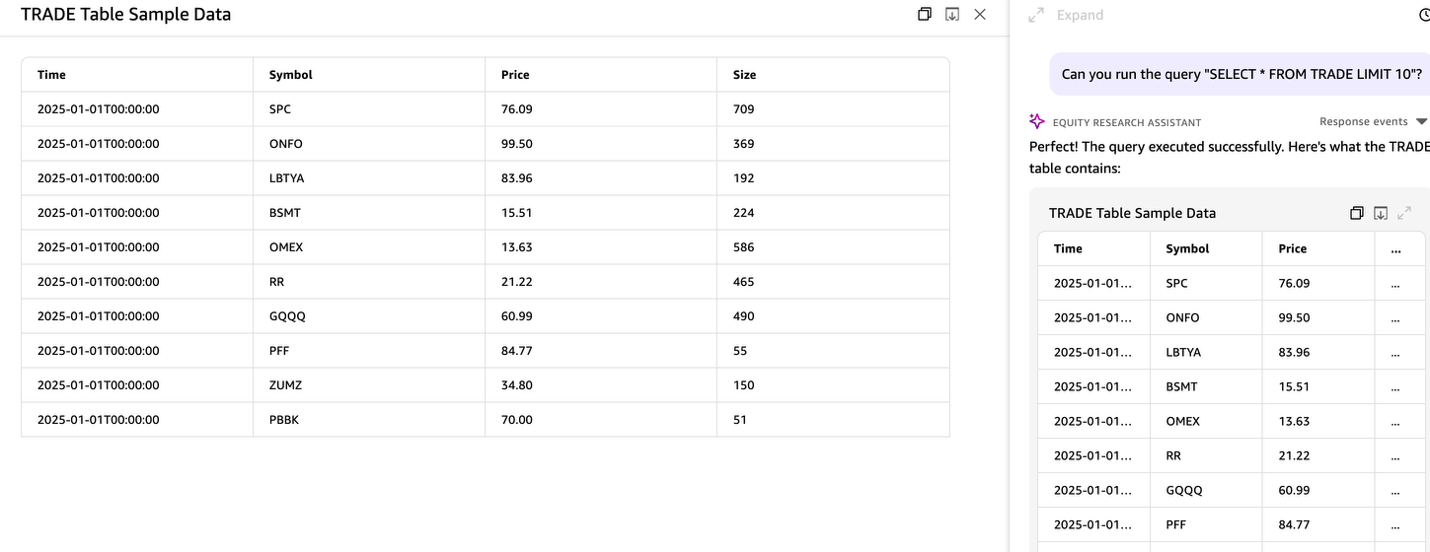
Ask the agent to retrieve a sample of 10 stocks from the database. This initial query helps demonstrate how the Quick chat agent understands natural language requests and translates them into SQL queries using the MCP server tool to query KDB-X tables.
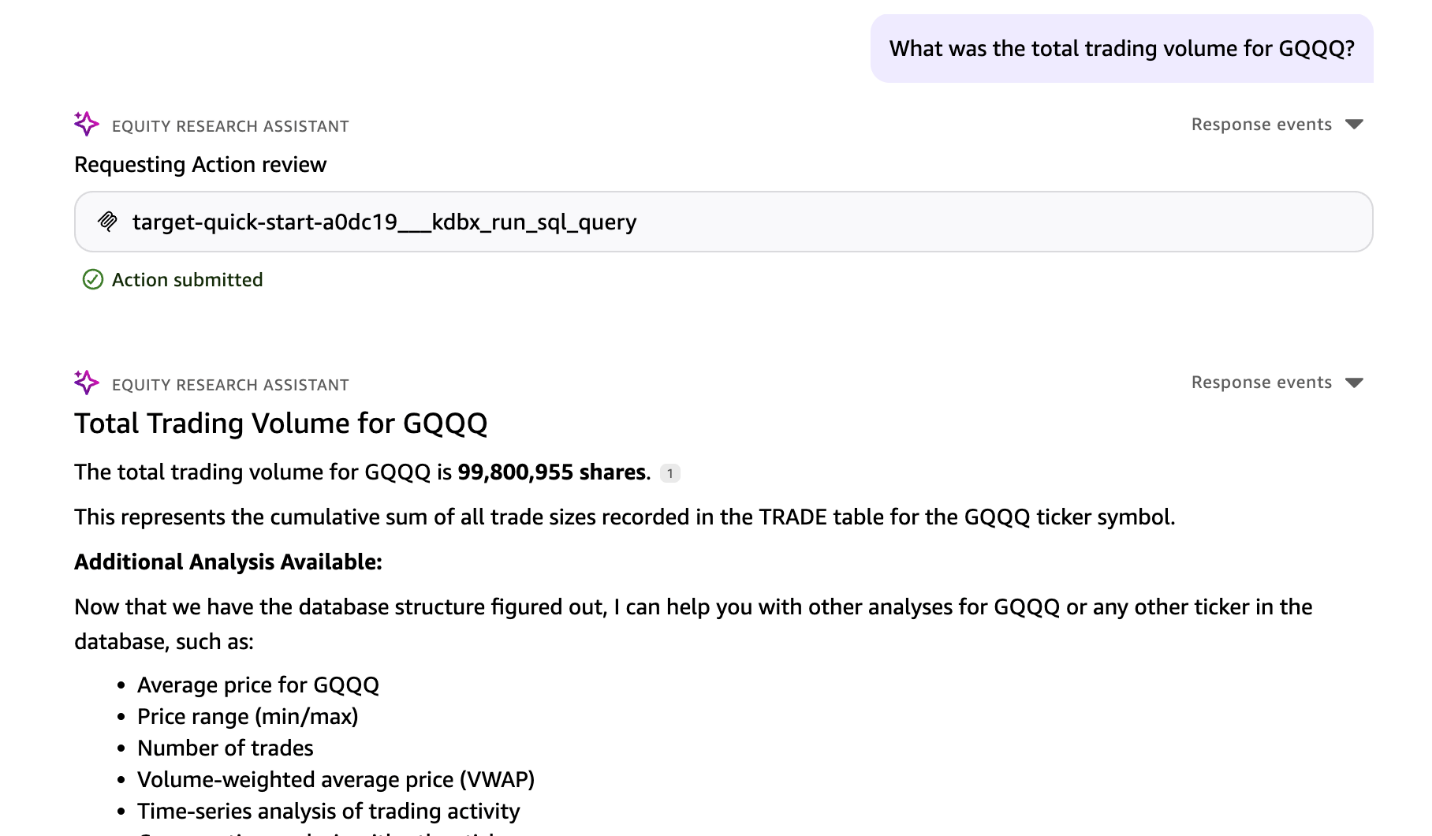
Query 2: Calculate total trading volume
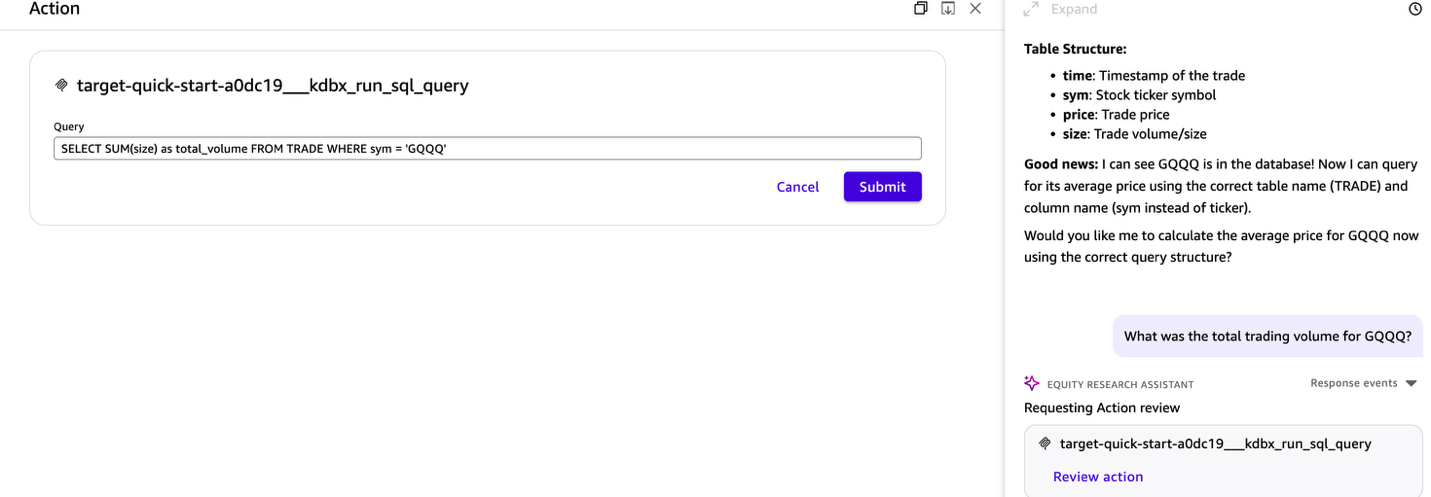
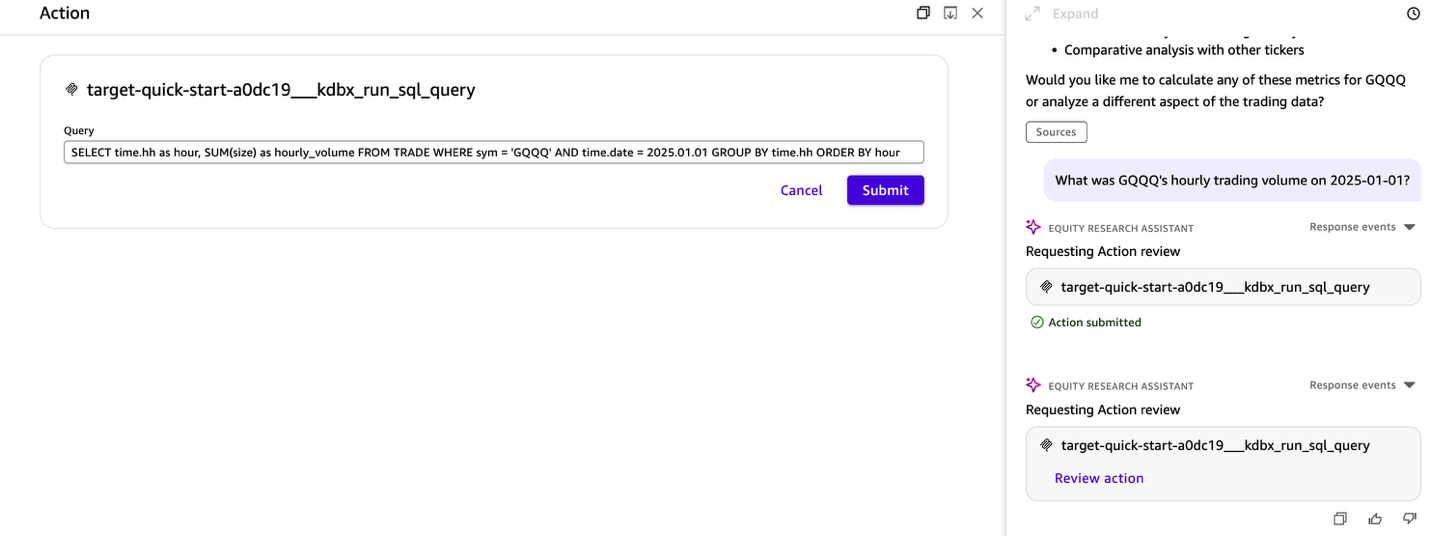
Request the total trading volume for a specific stock symbol. The agent queries the time series database to sum all trade sizes for that security across the available time period. The following screenshots demonstrate how the chat agent interprets the natural language query and frames the appropriate SQL statement. After the user reviews and approves the action submission, the agent executes the query against the KDB-X database and displays the aggregated trading volume results.
Query 3: Analyze hourly trading patterns
Ask for hourly trading volume breakdown on a particular day for a specific stock. The agent groups trades by hour and calculates volume metrics, revealing intraday trading patterns and peak activity periods.
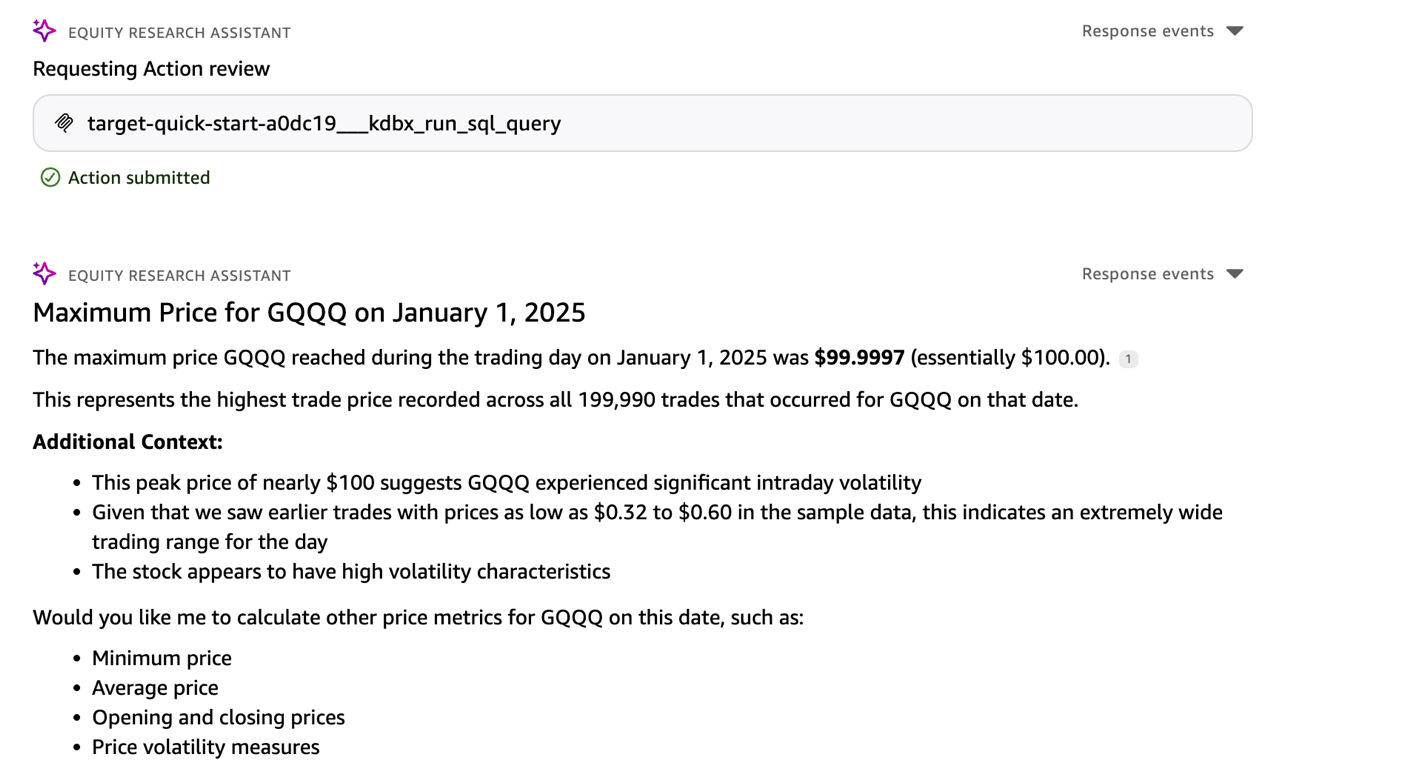
Query 4: Find maximum price
Query the maximum price a stock reached during a trading day. The agent executes aggregation query to identify the highest trade price recorded.
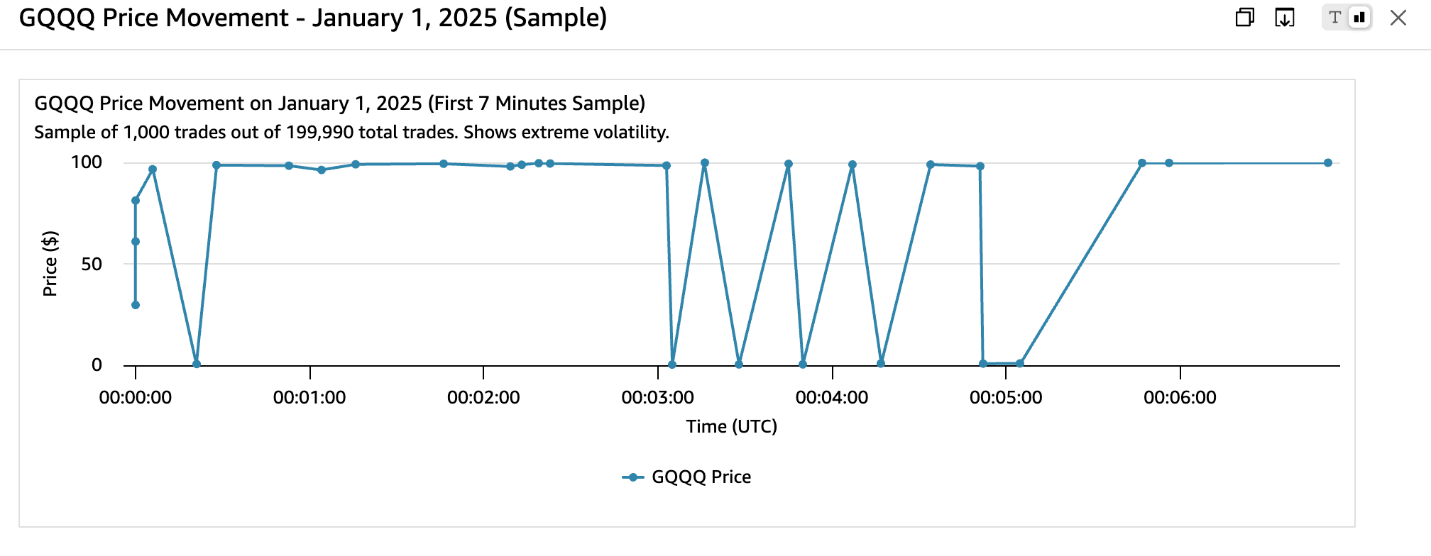
Query 5: Generate price visualizations
Request a visualization of price movements for a stock throughout the day. The agent retrieves time-stamped price data, processes it into a suitable format, and generates an interactive chart showing price trends and volatility patterns.
Clean up
To avoid ongoing charges, delete the resources you created while following this walkthrough.
- Stop and disable the MCP server and KDB-X services on your EC2 instance:
sudo systemctl stop kdb-mcp-server.service sudo systemctl disable kdb-mcp-server.service sudo systemctl stop kdb-x-service.service sudo systemctl disable kdb-x-service.service - Terminate the EC2 instance from the Amazon EC2 console or by running
aws ec2 terminate-instances --instance-ids <your-instance-id>. - In the Amazon Quick console, remove the MCP integration you created under Integrations > Actions.
- In the Amazon Bedrock AgentCore console, delete the gateway and the associated MCP server target.
- In the Amazon Cognito console, delete the user pool and any associated app clients you created for inbound authorization.
Conclusion
Financial services firms using time-series databases such as KDB-X face a significant challenge in democratizing access to market data. Querying time series databases to analyze market data requires specialized knowledge of q language or SQL.
With MCP integration in Amazon Quick using Amazon AgentCore Gateway, we demonstrated how to bridge this gap. Each interaction we explored demonstrates how MCP integration in Quick transforms complex database queries into conversational exchanges. Financial analysts can explore market data, identify trends, and generate insights without writing SQL code or understanding the underlying database structure.
For more detailed information about Quick integrations, see Amazon Quick integrations. For more information about Amazon AgentCore Gateway targets, see Amazon AgentCore targets.